

Engagement Ceremony


To use an ST7565 LCD module with a microcontroller, we will typically need to interface it by connecting the appropriate pins to our microcontroller’s GPIO pins and use a suitable library or driver to communicate with the display. In this example SPI (Serial Peripheral Interface) communication protocol interface is used which requires 5 GPIO pins at maximum.
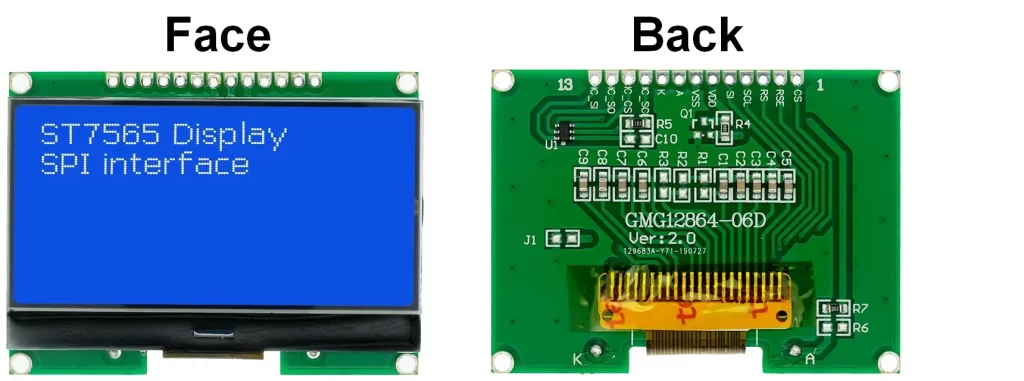
The ST7565 LCD module used in this example is the one shown below (GMG12864-06D)
The ST7565 LCD used in this project has 13 pins numbered from right to left as shown in the above image. The LCD module also contains a small 6-pin integrated circuit (IC) labeled as U1, this IC named as 16S1Y and it is used to get simplified Chinese character set font in 15×16 dot size, this IC also works with SPI communication protocol and connected to the microcontroller via 4-wire interface. The 16S1Y IC is not used in this project.
ST7565 LCD module pin description (numbering starts from right to left seeing from module back view):
Basically, the ST7565 controller works with 3.3V, applying a voltage of 5 Volts may damage it. The same thing applied to the LCD module I’m using in this example, we should use 3.3V both for power supply and control signals, connection of the LCD with the Arduino board is as shown in project circuit diagram below.

Circuit description:
The connection between the Arduino uno Rev 3 board and the ST7565 LCD is very simple, only 5 GPIO pins are required.
As mentioned above, the ST7565 LCD display works only with 3.3V, applying a 5V directly to the display module may harm its controller circuit. In this project the ST7565 LCD module is powered directly from the Arduino board with 3.3V where VDD pin of the LCD (#6) is connected to Arduino 3.3V pin and GND pin of the LCD (#7) is connected to Arduino GND pin.
For the 5 control signal connection between the Arduino board and the ST7565 LCD, I used voltage divider circuit for each control signal to get a suitable voltage for the LCD. Each voltage divider consists of 1k and 2k resistors and they are connected as shown in the circuit diagram above.
By applying voltage divider equation and assuming a 5V output from the Arduino board we get: 5 x 2/(2+1) = 3.33V which is very nice voltage value for the LCD.
The ST7565 LCD module is connected to the Arduino board as follows (each control pin connected to Arduino through voltage divider):
CS: connected to Arduino digital pin 5
RES: connected to Arduino digital pin 6
RS (A0): connected to Arduino digital pin 7
SCL(SCK): connected to Arduino digital pin 8
SI(SDA, MOSI): connected to Arduino digital pin 9
VDD: connected to Arduino 3.3V pin
GND: connected to Arduino GND pin
LEDA: connected to Arduino 3.3V pin
LEDK: connected to Arduino GND pin
Other pins: Not connected
The not connected pins are for the 16S1Y IC which is not used in this project.
LEDA & LEDK are LCD backlight LED pins.
Note that with this connection software SPI is used and it is configured in project Arduino code.
Interfacing Arduino with ST7565 LCD display code:
To make the interfacing example code more simpler I used an Arduino library for the ST7565 LCD display. This library works in dependency of Adafruit graphics library (Adafruit_GFX). Both library could be installed online through Arduino Library Manager.
For the ST7565 LCD, in the Arduino library manager search box write ‘st7565’ and install the one published by Simple Circuit, Arduino IDE may ask for other library installation (“dependencies,” like Adafruit_GFX or Adafruit_BusIO), if thery’re not already installed then you have to add them.
The ST7565 LCD library and Adafruit GFX libraries could be installed offline, GitHub links are below:
ST7565 LCD library
Adafruit GFX library
Note that this example was tested with ST7565 library version 1.0.2 and Adafruit GFX library version 1.11.17.
Code description:
Arduino libraries needed for project code are included as shown below:
To be continued…..


Sampai waktu wajib…